Skip to content

Lesson 14: Deploying Agents to the Cloud

Play

Watch on YouTube

Code for this lesson can be found here.

So far, everything we’ve built has been running on a local machine. Now, we are going to deploy it to the cloud.

You can package a Strands agent into a container and run it anywhere. In this guide, we will deploy it to AWS using Amazon Bedrock AgentCore.

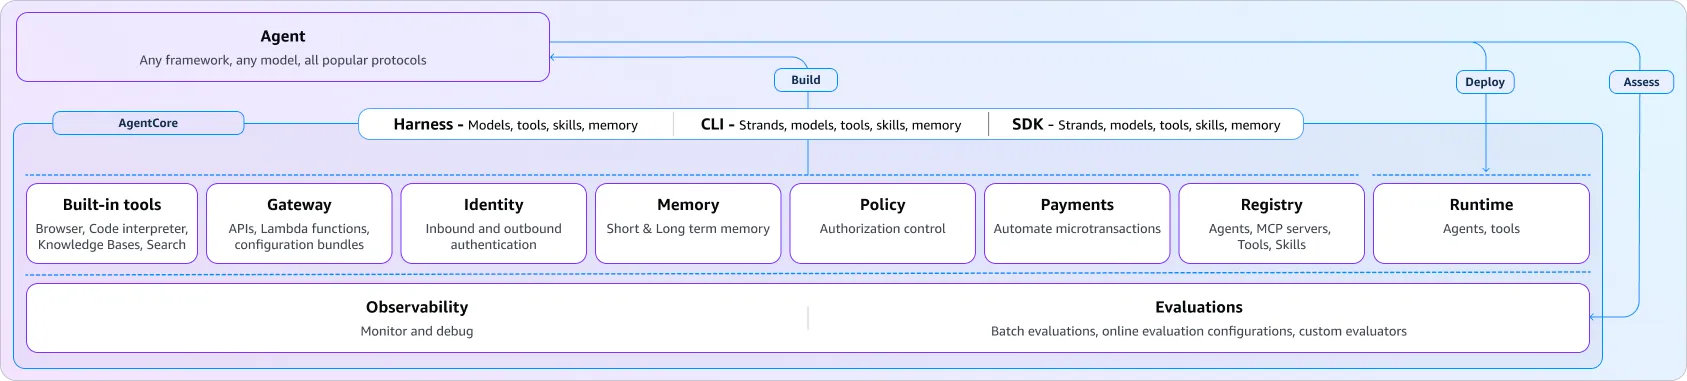
AgentCore is a collection of components designed for building, deploying, and operating AI agents in production. It includes capabilities like runtime, memory, gateways, observability, identity, and evaluations. You can use these components together or independently.

For cloud deployment, we focus on three main pieces:

  1. AgentCore Runtime: The hosting environment for your agent code. It runs agents inside isolated microVMs so that long-running and multi-agent workflows can maintain isolated state across requests.
  2. AgentCore Memory: A managed persistent storage and long-term memory retrieval layer.
  3. AgentCore Observability: Automated tracing and logging of agent execution.

Most of the agent code itself stays the same, but we need to add a few cloud-native modifications:

At the top of your code, import the Bedrock AgentCore app and instantiate it:

from bedrock_agentcore.runtime import BedrockAgentCoreApp
app = BedrockAgentCoreApp()

Add the @app.entrypoint decorator to the function handling incoming requests. This function receives a request payload dictionary, extracts the prompt, session information, and actor ID, runs the agent, and returns a response dictionary:

@app.entrypoint
def invoke(payload):
prompt = payload.get("prompt")
session_id = payload.get("session_id")
actor_id = payload.get("actor_id")
# Run agent loop ...
return {"response": result}

At the bottom of your file, add app.run() to launch the web server.

if __name__ == "__main__":
app.run()

In the function where you instantiate your agent, construct the AgentCoreMemoryConfig and pass it into the AgentCoreMemorySessionManager. The session_id and actor_id live on the config; long-term memory strategies (semantic, user preference, summary) are configured on the memory resource itself when you create it, not here.

from bedrock_agentcore.memory.integrations.strands.config import AgentCoreMemoryConfig
from bedrock_agentcore.memory.integrations.strands.session_manager import AgentCoreMemorySessionManager
memory_config = AgentCoreMemoryConfig(
memory_id=memory_id,
session_id=session_id,
actor_id=actor_id,
)
session_manager = AgentCoreMemorySessionManager(
memory_config,
region_name="us-east-1",
)

The AgentCoreMemorySessionManager connects your agent directly to a managed memory resource deployed in AWS. It uses an actor ID to identify the user and a session ID to identify the specific conversation.

This provides persistent conversation history as well as long-term memory retrieval across sessions. For example, if a customer had an account issue several conversations ago, the agent can recall that information later without being explicitly told again.

The integration pattern is identical to local session managers: you simply swap out the session manager implementation when instantiating the agent.

To deploy, you will use the AgentCore Command Line Interface (CLI):

Step 1: Install the CLI & Initialize the Project

Section titled “Step 1: Install the CLI & Initialize the Project”

Ensure you have the CLI installed, then create a new project:

Terminal window
agentcore create

Go through the interactive prompts to bootstrap your project structure, configuration, and infrastructure files:

  • Project Name: customer-service-agent
  • Agent Option: Yes, add an agent (e.g., my-agent).
  • Source: Select “bring my own code” and accept the defaults pointing to your local files.
  • Build Type: Select direct code deploy.
  • Model Provider: Select Bedrock.

This command generates a local directory containing an app folder. Drop your customer service agent Python files directly into this generated directory.

Add memory support to your deployment configuration by running:

Terminal window
agentcore add memory --name customer-service-memory

During this step, configure long-term strategies for memory extraction like semantic and user_preference.

Execute the deployment:

Terminal window
agentcore deploy

On your first run, this command will take a couple of minutes while AWS provisions the underlying infrastructure and deploys the agent to the Bedrock AgentCore Runtime.

Once deployed, you can invoke the hosted agent from the command line using agentcore invoke.

Terminal window
agentcore invoke --session-id "sess-999" --prompt "I need help returning my order."

Response: “I’d be happy to help you with a return. Can you please provide me with your customer ID?”

Because session history is preserved in AgentCore Memory, you can send subsequent requests using the same session ID:

Terminal window
agentcore invoke --session-id "sess-999" --prompt "C10001"

Response: “I was able to find your account. Which order would you like to return: the headphones or the USB?”

The runtime handles routing your requests to the active session and retrieving its corresponding conversation history, allowing the agent to seamlessly carry state across multiple distinct invocations.

Visualizing Agent Execution: Observability Traces

Section titled “Visualizing Agent Execution: Observability Traces”

By including OpenTelemetry (OTel) dependencies in your project, AgentCore automatically instruments your code.

If you navigate to the AgentCore Console and open your agent’s dashboard, you can access the Gen AI Observability dashboard. This view allows you to inspect execution details:

  • Session View: Select any session ID to view the list of execution traces.
  • Trajectory Mapping: Opening a specific trace displays a visual graph of the execution path. You can trace when the agent started, when the loop executed, when it called various tools, and when it called the model.
  • Detailed Context: On the right-hand panel, you can inspect the exact prompts sent, the system instructions injected by your plugins (such as dynamically loaded skills), and the model’s exact responses.
  • Timeline View: You can drill down into the exact duration metrics for each component span to identify bottlenecks.

A deployed agent itself is only one part of an overall production architecture. While AgentCore Runtime handles the authentication gate automatically (using IAM or OAuth), a real-world system still requires surrounding infrastructure:

  • API gateways
  • Rate limiting
  • Retry mechanism
  • Security controls
  • Multi-region error handling

Throughout this course, we have built the orchestration layer for your agent harness—handling tools, hooks, steering, multi-agent coordination, and evaluations. In this final step, we added the cloud infrastructure layer underneath it. Together, they form a complete, production-ready AI agent harness.

All the code from this course is available in the companion GitHub repository. You are now ready to compose and scale these systems for your own production use cases!

Learn more: Deploying Strands Agents to Amazon Bedrock AgentCore Runtime